Velocity edits on videos can help you to slow down or speed up certain parts of a video based on your preferences. This is one of the most popular video editing techniques that people use as of now. For example, there’s a trend on TikTok and a lot of people do velocity edits to their videos and upload the videos on TikTok.
You can easily do velocity edits to a video with the help of CapCut. CapCut is a video editing app, which is owned by the same company as TikTok. Therefore, doing velocity edits on videos with the help of CapCut is not something that you should think twice. From this article, we will be sharing the steps that you need to follow, so that you will be able to do velocity edits on CapCut.
Steps to do a velocity edit on CapCut
To make your life easy, we thought of sharing a step by step guide, which you can follow to learn how to do a velocity edit on CapCut. Make sure that you adhere to these steps to get the job done without any challenges.
Download and install CapCut app
If you don’t have the CapCut app, you should first download and install it. CapCut is a mobile app. Therefore, you need to have an Android or an iOS device to install it. If you have an Android device, you may download CapCut APK and proceed with installation. On the other hand, iOS users can get the CapCut app from Apple App Store.
Launch CapCut
When you have the CapCut app running on your device, you may go ahead and launch it. All you have to do is to tap on the CapCut icon, and you may launch the app. Then you will be able to hit on the button named “New Project” towards your left. Along with that, you will be able to start the velocity edit project on CapCut.
Add the video to CapCut
The next step is to add the video where you want to do a velocity edit into CapCut. You will be able to pick any video saved in your mobile phone to the CapCut editing timeline. After selecting the video, you can simply tap on the “Add” button, which you see on the lower right hand corner of your screen.

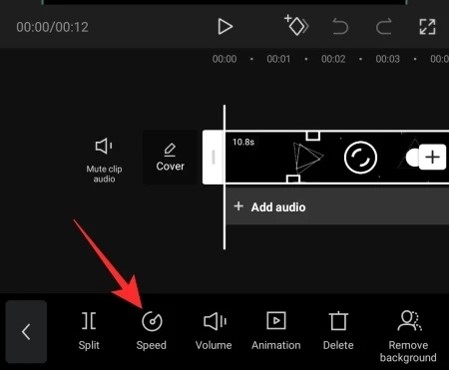
Hit on the speed button
After adding a video, you will be coming to the CapCut editing screen. This is where you will be able to do many different types of edits on the video. Since you want to do a velocity edit on the video, you will need to pick the specific clip on the timeline and then hit on the “Speed button”, which you can see below.
Hit on the curve button
When you are making a velocity edit, you need to have a smooth transition as much as possible. This is where the “Curve button” can help you. You will be able to customize your velocity edit by hitting on the curve button. Then you will be able to easily customize your velocity edit.
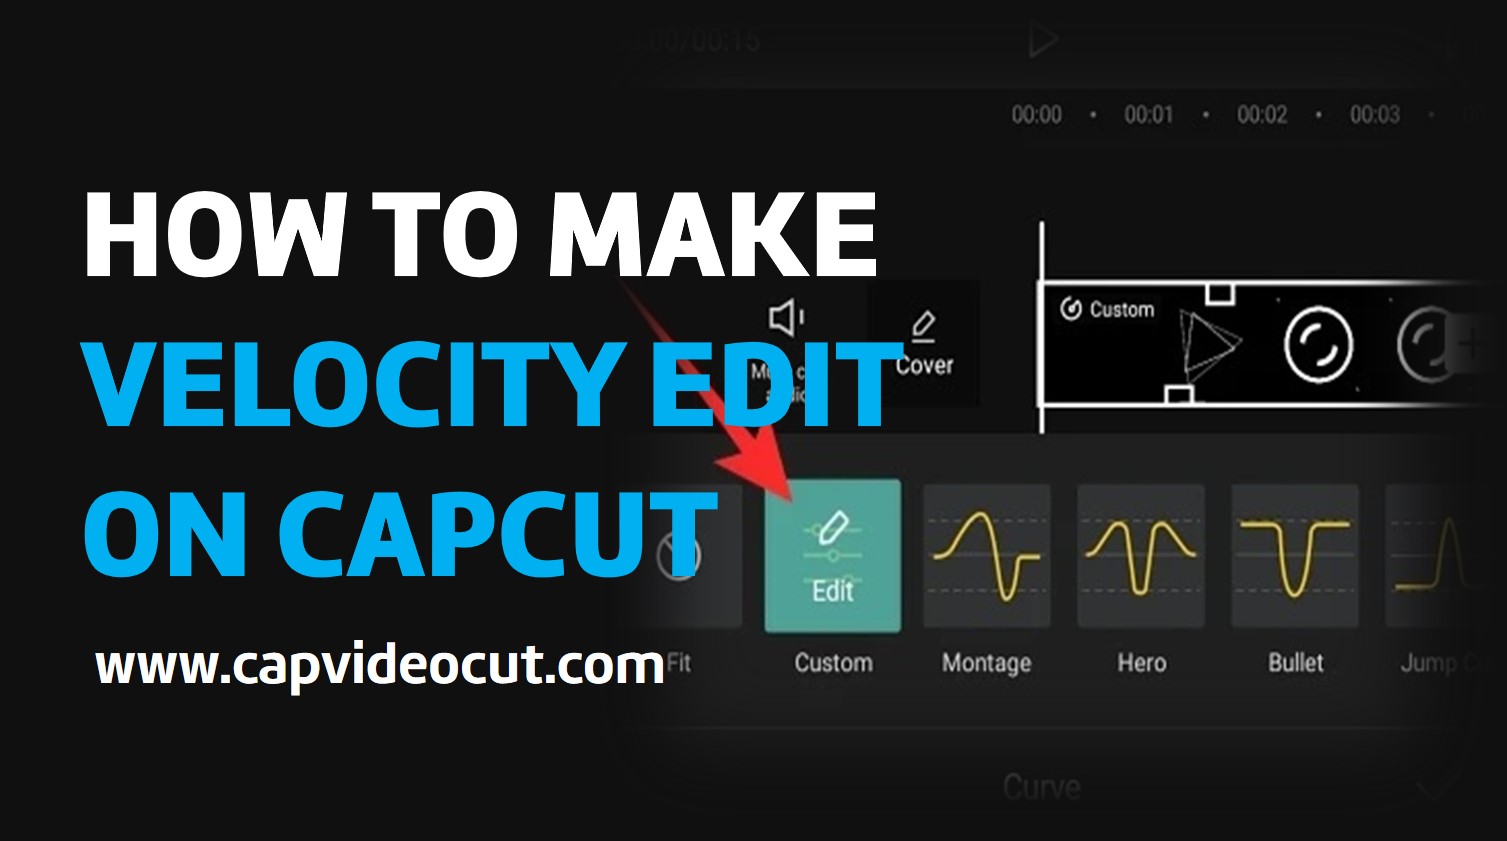
Hit on the Custom button
The next thing you need to do is to hit on the custom button. This will help you to further customize your velocity edit on CapCut and make it look even better. For example, you will be able to get hold of multiple presets to enhance your velocity edit on this step. Some of the presets available for you to select from include Bullet, Hero, Montage, Flash In, Flash Out, and Jump Cut. Make sure that you pick the most appropriate preset out of available options and make your velocity edit stand out.
Edit velocity as you drag the dots
One of the most unique features that you can get with CapCut is the spectrogram. When you see the spectrogram, you will have the drag and drop the dots accordingly. By doing this, you will be able to easily adjust the overall placement of your velocity edit. CapCut calls this as the beat. You will be able to customize your speed changes in the velocity edit through this feature. The slowest speed that you can have been 0.1x whereas the fastest speed that you can have would be 10x.
You will also be able to go ahead and add beats to the timeline. All you have to do is to hit on the “Add Beat” button to do it. When you add new beats, you will be creating a frequent velocity change in the video.
Save your velocity edit
Now you are done with making all changes to the velocity edit. Therefore, you will be able to go ahead and save your file. To export the video, you will need to pick the Export button, which you see on the top right hand of the corner. It is possible to export the video to your device in multiple formats. Or else, you can export the video directly to a social media platform such as Instagram, Facebook, WhatsApp, or TikTok.
Tips to make the velocity edit on CapCut rhyme along with music
It is better if you can get the velocity edit on CapCut to rhyme along with music. Then you will be able to make your video look perfect. Here are the steps that you will need to follow for it.
- First get into the main workspace interface of your CapCut app.
- Now you can pick the feature named “Match Cut”. This is a feature in CapCut, which allows you to create beats for all your videos automatically. The beats that you create would rhyme along with background music. CapCut is intelligent enough to create a smooth beat.
- Next, you will need to go to the Speed menu, pick Curve, and then select Custom. This is where you will be able to see how the speed beat gets lined up along with your timeline.
- Now you will be able to drag and adjust the velocity of each and every beat. When you are doing that, you should be careful not to make any changes to the horizontal positioning of the dots. If you do that, the beats will not rhyme along with background music anymore.
Final words
Now you have a clear idea on how to make velocity edits on CapCut app. Just follow these steps, and you will be able to end up with creating perfect videos with the help of CapCut.