CapCut is one of the most popular and effective video editing tools available out there. It offers some advanced video editing capabilities as well. Therefore, anyone who is looking for a video editor for Android or iOS may think about using CapCut. This app is developed by the company that created TikTok.
As you are about to get CapCut, you will also come across the need to figure out how to edit videos with it. From this article, we are looking forward to sharing some details with you on how to edit videos with CapCut.
How does the CapCut interface look like?
CapCut has a simple and a clutter-free interface. When you take a look at the top right hand corner, you will be able to see a button named 1080p. You can tap on this button to adjust the frame rate and resolution. Default resolution will be 1080p and frame rate will be 30 frames per second.
You can find an export button at the top right hand corner of the CapCut interface. By clicking on this button, you can save your CapCut project and export it. If you want to preview the video, you will need to tap on the playback window, which is located at the middle of the interface. You can find maximize, redo, and undo buttons, similar to most other video editing apps.
You will be doing all the edits in the editing timeline, which you can see on the bottom of the interface. Under the menu bar at the bottom, you can see other settings, such as text settings, audio settings, and special effects.
How to create your project on CapCut?
Every video editing task on CapCut will be a project. You will be doing changes to the video on a project. You will need to launch CapCut app and then tap on the button named New Project. Then you can pick the primary video clip that you want to edit and tap on Add button.
There can be multiple videos that you want to add as a primary video. This is where you can pick the “Multiple” button. You can also add B-roll footage into the app based on your preferences.
Once you launch a new project on CapCut, the app will set format to the project automatically. This varies depending on the nature of footage you upload. For example, if you upload a widescreen video as your primary video, your project will be a widescreen project. In case if there is a need to change the project type, you will need to hit on the “Format” button, which you can see at the bottom of your menu.
You will be able to find a large number of format options to select from. For example, if you are going to create a video for TikTok, you will need to do it in portrait mode. Widescreen format is more appropriate for YouTube. We encourage you to pick 16:9 aspect ratio to get best results on YouTube. You can also have many different versions of the same project in multiple format. This will provide a great assistance to you as you repurpose content on CapCut.
How to edit videos on CapCut?
At the time of editing a video, you will first need to get rid of all unwanted content on it. This is where you need to split and remove the mistakes. You can use the split tool to split your video into two. This has to be done at the beginning of the piece of video that you want to remove. Then you should split again at the end of the part that you plan to remove. Timeline and preview window will be helping you here, and you can make sure that you get the job done with ease. After splitting the part that you want to remove, you can tap on the Delete button.
You will also be able to remove unwanted footage on your videos with the help of handles. It is possible to see white colored handles at the start of every clip. You can drag the handles to the place where the beginning of unwanted footage starts. You can similarly drag handles from the end of your video as well. Once the handles are in position, you can hit on the split button. Likewise, you can easily drag handles and trim unwanted footage with ease.
As a tip, we encourage you to use CapCut and edit videos backwards. This will help you to get the edits done in thee easiest way.
How to include a B-roll into CapCut?
To add a B-roll into your video, you will need to tap on the Overlay button. After that, you can hit on the “Add Overlay” button. This is where you will be able to add any photos, videos, or graphics into the video. You just need to make sure that visual content is saved on your mobile device. By going through list of footage, you can pick anything that you want to include in the videos and then hit on add button.
It would take some time for the B-roll to load and add into the timeline. You can see it under the primary footage on your timeline. Then you can tap on the B-roll and drag it, so that you can change its position on the timeline as per your needs.
It is also possible for you to add one B-roll footage on top of another. You just need to add the new B-roll into the timeline under the first layer. After you exist from the Overlay button, CapCut will automatically compress content.
How to include titles on CapCut?
Two different methods are available for you to include titles on CapCut for the videos. First, you can add just basic text into the video. Or else, you can think about adding text into the video via a text template as well.
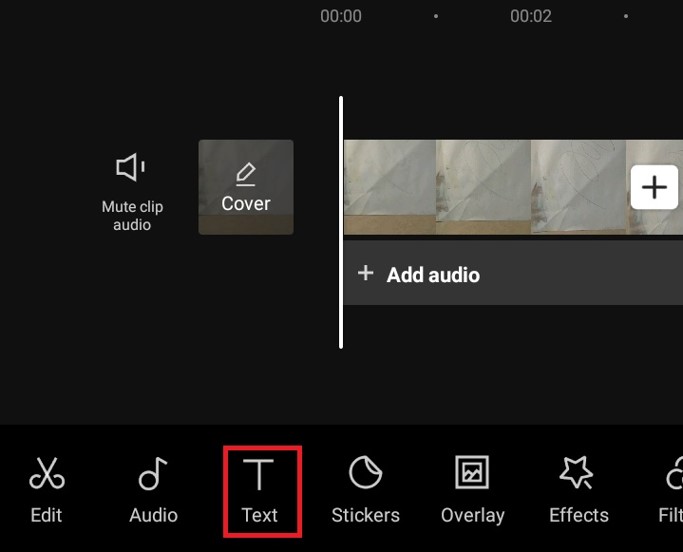
To add a simple text, you just need to tap on the Text button and select “Add Text”. You can now type and enter the text that you want to add. You can change the effects, color, font, background, stroke, and effects based on your preferences. You need to make sure that you don’t forget branding guidelines as you continue to add new text into the video. On top of that, you need to ensure that text is easily identifiable, regardless of the background. You can tap and then drag, so that you can move the text box to different places. You can easily adjust the overall size when you pinch in and pinch out.
After adding text to a video, you can animate it as well. This is where you need to tap on the Animation button. After that, you can decide if you want to loop in the video or loop out. You will also be able to find multiple animation effects to select from. It is possible to use the handles and move the animated text around your videos.
The next option to add text would be to use one of the text templates. To pick and add a text template, you will need to tap on the Back arrow button. Then you need to pick the option named “Text Template”. Under text template, you will be able to find a large number of animations and titles to add. You can simply go through those options and add anything you want. On top of that, you can find clocks, timers, symbols, and subtitles as well. You just need to pick anything that you want to add and insert into he project. After adding text, you can fine-tune and adjust the location and length, as you would do with other basic titles.
After adding text, you can hit on the back arrow button. Then you can see how the original video is getting compressed. All the titles would appear on top of the primary footage as a red colored line. You can edit them later by tapping on the text button. You can add titles as you prefer and then include transitions to them as well.
How to include transitions on the video with CapCut?
Few different methods are available for you to add transitions to CapCut. These transitions can help you to smoothen out the changes from one video to another. You will be able to apply transitions into B-roll footage and make things look great.
-
How to add transitions into B-roll clips
After adding B-roll clips, you will be able to see tap that available on top of primary footage. You may click on any of the B-roll icons and then open up the clip. After that, you will need to tap on the button named Animation. Then you can pick any of the options out of Combo, In, and Out. If you select In, you will be able to see the traditional effects and transitions. Likewise, you can pick Combo, and you will be provided with some new movements, which will surely assist you with polishing up the video. In case if the B-roll is pretty stagnant or quite, you may think about picking any of the available presets, so that you can make things look exciting. You can change the duration available in the sidebar, so that you can change the transition length. After adding a transition, you can pick the Tick icon, so that you will be able to save your transition.
-
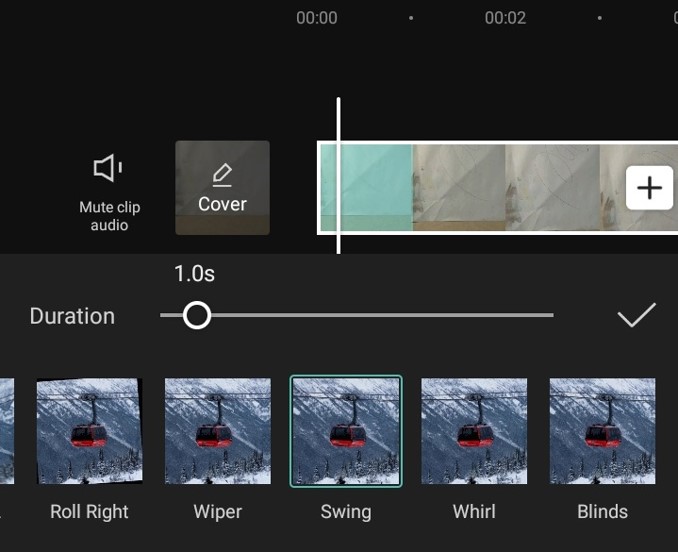
How to add transitions into primary footage
If you want to add transitions to the primary footage, you will need to tap on the White colored square icon, which you can see in between the two different clips. After clicking on the white square, you will notice how many different presets will be visible on the screen. You can pick one of them to select. Then you can adjust the slider to move its duration.
One important thing to keep in here is not to go overboard with your transition. In case if there are hectic transitions, your video will look unappealing. Different transitions available in your video should be identical and complement each other. Then you can ensure consistency throughout the video.
-
How to add zoom cuts into your videos as transitions
Along with the help of zoom cuts, you will be slightly zooming in the shot, so that you can make it quite different from the previous shot. This will eventually assist you to make sure that your video looks like you have shot with two camera angles. In order to use zoom cuts, you will need to pick the second shot available in the timeline. Then you can pinch your footage that is available in the playback window, so that you can slightly zoom it in. After that, you can adjust its placement, so that the framing of it matches with the framing of earlier shot.
You can now get back to the video and play it. This is where you will be able to see the amazing effect that a zoom cut is adding to the video. This is a hassle-free and an effective method available to keep your audience engaged.
How to add different effects to your videos on CapCut?
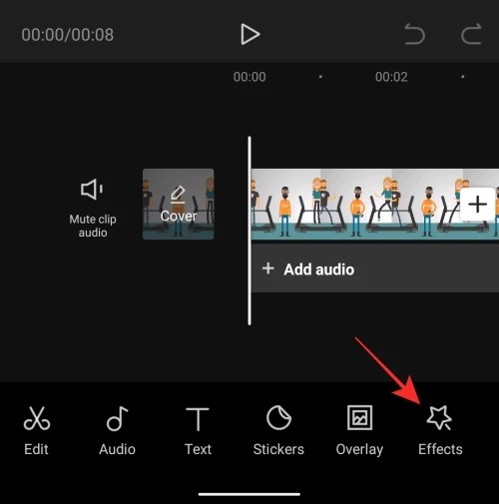
If you want to add effects into your CapCut video, you will need to tap on the Effects button, which you can see at the bottom of your menu. Again, there are a ton of possibilities from which to choose in this area. These kinds of effects aren’t often used in our films, but you may experiment with them here. There are many more fantastic effects within CapCut apart from these Effect filters. You may use effects to eliminate the backdrop, change the pace, and stabilize video. Let’s discuss how to utilize these effects.
How can you remove background from a video in CapCut?
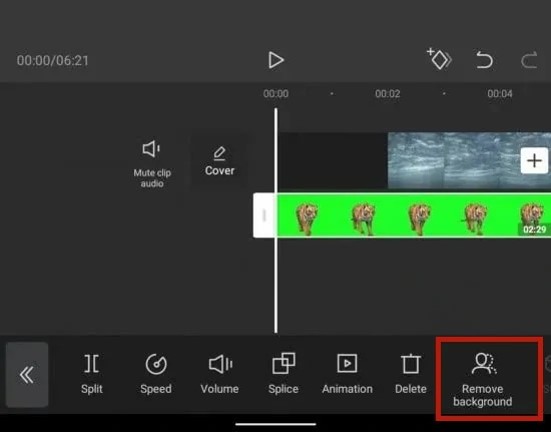
This impact is really potent. Choose a clip, then click Remove background. The backdrop will then be completely removed when CapCut analyzes the footage. It does a fantastic job at this! You may be incredibly inventive with your editing thanks to this fantastic effect.
How to change the video speed in CapCut?
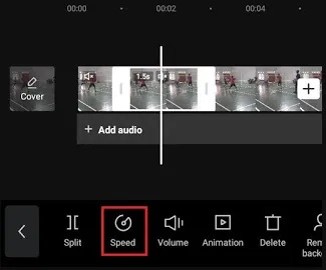
By choosing the clip and tapping Speed, you may change the speed of the selected clip. Here, two choices are available. The first option is called normal, where you can modify the slider bar, so that you can increase your playback speed or decrease your playback speed. Then you can pick the curve option, which provides additional control over the adjustment of speeds.
How can you stabilize a video clip on CapCut?
A prominent feature that you can find in CapCut is the ability to stabilize the video clip. You will need to pick a video clip, and then slide under the bottom menu, so that you can see an option named “Stabilize”. By selecting this option, you will be able to effectively get rid of camera shake that is present in the footage. In case if you are not having a tripod to film the video, this feature will be quite useful.
How can you add audio into CapCut?
You can add any audio clip based on your preferences into the CapCut video. You will need to go near the beginning of your video footage. Then you can pick the option named “Add Audio”. After you click on this button, you will be directed to the music library available at CapCut. However, you have the freedom to pick and add your own preferred video as well. You can purchase audio from websites such as Epidemic Sound and Artist and add into the videos.

It is also possible to pick audio from your own mobile device and add them into the video. In case if you are going to add an audio track from the music library of CapCut, you will need to select a track and then hit on the Download icon button. After that, you can add it into the timeline.
After you add an audio clip, you will be able to see it under the primary footage. It is possible for you to move this, cut, and then adjust, so that you can get the audio clip on top of another clip. After adding audio, you can adjust its music level as well. This will help you with enabling audio as background music in the video as well.
How to color grade a video on CapCut?
CapCut provides you with multiple filters, which you can use to color grade any video. However, you may also find the feature to adjust the color grading of a video manually.
If you want to add a filter and color grade, you will need to tap on the option named Filters. These filters on CapCut are quite similar to Instagram filters. You just need to browse through available filters, pick the best fitting filter, and then hit on the Tick icon, so that you can add it. You will be able to add the filters manually to different videos that are available on the timeline.
As mentioned earlier, you can adjust the color grading of your video manually. This is where you need to hit on the button named Adjust. After that, you can change the shadows, exposure, color temperature, contrast, and saturation of a video. After making changes, you can click on the tick icon, so that you can get the changes to be visible on the timeline. You will be able to stretch the edit, so that you can get it extended upon the entire timeline.
Final words
Now you have a basic idea on how to edit a video on CapCut. Follow these steps, and you can easily edit any video of your choice on the app.